Jet3D Tutorial 1
The Basics of Jet3D's level designer - jDesigner3D or jDesignerClassic11
Overview:
This tutorial will lead you through the construction of a fantasy hallway. The plan is to start off by building the basic hallway in the 2D views. You will use several cylinders, and a cube. Then you will add some lights so that you can use the 3D view to examine your work. The tutorial then leads you through adding some rafters and shows you how the real time light tool allows you to adjust the lighting and shadows. You will add some translucent geometry for water, and use a mirror to highlight the ceiling. A bit of texture alignment completes the scene.
Getting Started:
1. First, let's remove the promo box with the Jet3D logo. Select the orange box in the Top XZ view by clicking on one of the edges. You will know it's selected when it changes color to become a dotted line. Then hit the Delete key. The 3D view in the top left should become black, but don't panic - there's just nothing left in your level to see.
2. Go to Options | Grid Settings, and set the grid snap to 16 and hit OK.
Check out your Top XZ view.
You should now have a light gray grid with a heavy gray grid overlay. These
darker lines are your 16 texel
"snap" lines that we will use for this tutorial.
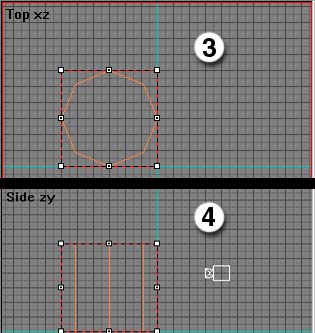 3. Click on
the "Cylinder" button (same effect as Tools |Template Kind |Cylinder).
Your cursor should now be a floating cylinder. Starting at the center
(where the blue "constructor" lines meet) of the Top XZ view, click and
hold the left mouse button. As you move it around, you'll notice a red
box (your size meter). Stretch a box up and to the left until you have
one that is six dark blocks by six dark blocks (you'll notice the red
lines always fall on the dark grid).
3. Click on
the "Cylinder" button (same effect as Tools |Template Kind |Cylinder).
Your cursor should now be a floating cylinder. Starting at the center
(where the blue "constructor" lines meet) of the Top XZ view, click and
hold the left mouse button. As you move it around, you'll notice a red
box (your size meter). Stretch a box up and to the left until you have
one that is six dark blocks by six dark blocks (you'll notice the red
lines always fall on the dark grid).
4. Let go of the button, and you will find that the height of your box is changing in the lower view-port (Side ZY). As you move the mouse up and down, the height of the red box changes. Move up until the box is 6 dark blocks tall, and click the RIGHT mouse button. The right mouse button makes "cut" or negative brushes, while the left mouse button will make "solid" brushes. Two quick notes here. A "brush" is a term used to describe a solid cube, cylinder, or a sphere. A brush can be positive or negative. Think of the empty world you are editing as a block of solid material. A negative "cut" brush will chisel out a shape, and a positive "solid" brush will add material back in that shape. If at any time you have made a mistake in making your brush, simply select it (click to make it red) and hit the Delete key. Then start at the beginning of the step. If you accidentally made a "solid" brush (it will be white when not selected - cut brushes are orange), you can select it and change its properties to "cut" in the menu on the right.
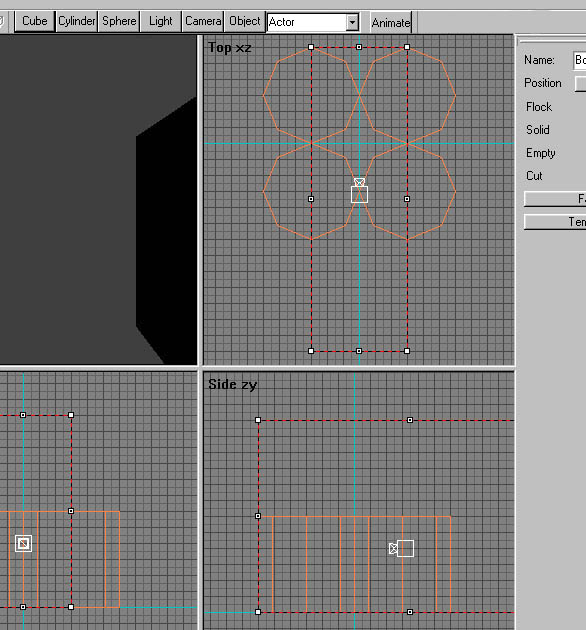 5. Let's "clone"!
With your new cylinder selected, hold down the shift key, and click-drag
to the right (don't release yet!). Make sure you have the "move-cursor"
(a cross of arrows) and not the "scale-cursor" (left-right arrow) when
doing this step. You should now have a second cylinder hovering around.
Line it up on the right side of the blue line, so that it mirrors the
first one, and release the mouse button. Repeat this cloning with your
new cylinder so that there is one more below, and again to make a fourth
cylinder across the way. You should now have four orange cylinders in
each quadrant of the blue cross.
5. Let's "clone"!
With your new cylinder selected, hold down the shift key, and click-drag
to the right (don't release yet!). Make sure you have the "move-cursor"
(a cross of arrows) and not the "scale-cursor" (left-right arrow) when
doing this step. You should now have a second cylinder hovering around.
Line it up on the right side of the blue line, so that it mirrors the
first one, and release the mouse button. Repeat this cloning with your
new cylinder so that there is one more below, and again to make a fourth
cylinder across the way. You should now have four orange cylinders in
each quadrant of the blue cross.
6. Hold down the space bar and drag the top view around with the left mouse button. You can also zoom in and out with either the mouse wheel if you have one, or the plus and minus ('+' and '-') keys on the top right of the keyboard on the separate number pad. Give yourself a little more room below the Cylinders for now. Click on the "Cube" button and go to the Top XZ view. Starting at the tip of the top left cylinder (3 left and 6 up from the blue cross) click-drag to begin your box. Without releasing yet, move across the middle tip of the right cylinder, and then down, well below all four cylinders. When you reach about 6 dark blocks below the bottom tips of the lower cylinders, release the button, and watch the height change in the Side ZY view. Move the mouse up to at least 6 dark blocks above the cylinders' heights, and click the RIGHT mouse button to make this additional "cut" brush.
 7. It's high
time we examined what we've done, but first we'll need to shed a little
light on our work. In the Side ZY view, position the mouse over the blue
horizontal "constructor" line. Move it up halfway, or 3 dark blocks higher
than it was. This will make sure that our lights are placed at a reasonable
height. Click on the "Light" button, and then click just inside the upper
left cylinder, in the Top XZ view. You can select it and move it if you
miss the first time. With the lights selected, let's change the 'Brightness'
to 4 and the 'Radius' to 100. Then do the same for each cylinder, or clone
the light with "shift-drag", until you have all four lights positioned.
Place a fifth one at the bottom of the middle brush.(our hallway).
7. It's high
time we examined what we've done, but first we'll need to shed a little
light on our work. In the Side ZY view, position the mouse over the blue
horizontal "constructor" line. Move it up halfway, or 3 dark blocks higher
than it was. This will make sure that our lights are placed at a reasonable
height. Click on the "Light" button, and then click just inside the upper
left cylinder, in the Top XZ view. You can select it and move it if you
miss the first time. With the lights selected, let's change the 'Brightness'
to 4 and the 'Radius' to 100. Then do the same for each cylinder, or clone
the light with "shift-drag", until you have all four lights positioned.
Place a fifth one at the bottom of the middle brush.(our hallway).
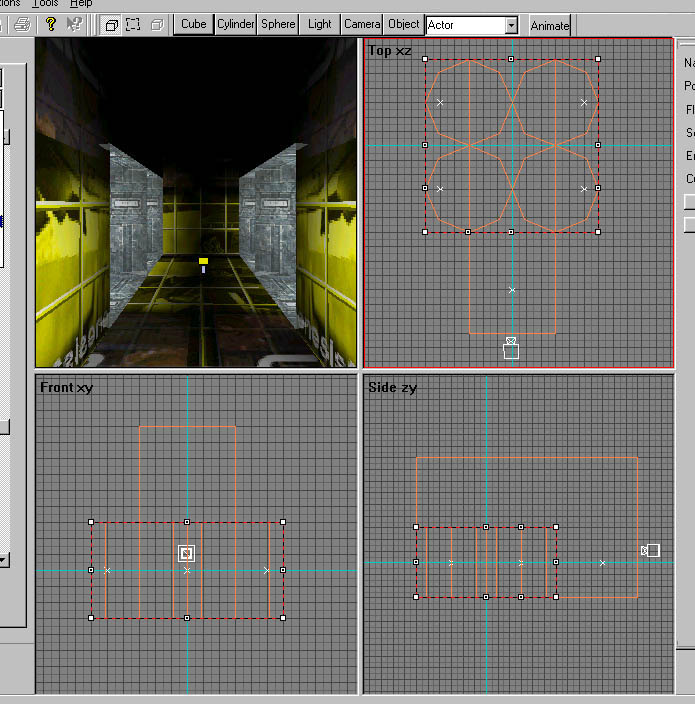
8. It's time to rebuild and examine. Press F8 and choose "Rebuild All". Whenever you have made a number of new changes to the structure of your level, you will want to "clean up" your level, which will improve 3D performance. The rebuild is much like de-fragmenting a hard disk. Use the camera in the 3D view to look around. The left button will zoom in and out and spin you, the right button will roll the camera in every direction, and both buttons will slide the camera up and down, and side to side. Note that you can choose a face by clicking on it in the 3D view, and you can choose all of the faces on a brush when it is selected in one of the 2D views..
 9.
In the 2D view, use the CTRL key to select all four cylinders at the same
time(click one and then another - you can also drag a box around all four
cylinders). Browsing through the textures on the left, choose "Tech_blue"
by clicking on the texture itself. Your selected cylinders should now show
that texture. Select the long rectangle down the middle and choose "Marble"
for its texture.
9.
In the 2D view, use the CTRL key to select all four cylinders at the same
time(click one and then another - you can also drag a box around all four
cylinders). Browsing through the textures on the left, choose "Tech_blue"
by clicking on the texture itself. Your selected cylinders should now show
that texture. Select the long rectangle down the middle and choose "Marble"
for its texture.
10. We're now going to add some rafters above the hall. In the Side ZY view, move the blue horizontal constructor line 3 blocks higher, so that it is in line with the tops of the cylinders. Now, in the Top XZ view, use the "Cube" button to make a thin box. Start at the bottom tip of the left cylinder , and across to the bottom right tip, just as before, but this time only drop down one block length. Once you have this thin rectangle, release, and in the Side view move the height up to one block above the constructor line. LEFT click this time, because we want a "solid" brush for a rafter. Use the shift key to "clone" this rafter, by shift dragging the little rectangle down in the Top XZ view. You have now made a second rafter; allow about two blocks of space between the first and second of these brushes. Shift-click and drag again to make a third below these, and repeat until you have about six or seven spaced evenly across the top of your hallway. They should already be using the "marble" texture that we chose last for the hall walls. If not, select them and choose "marble".
Oh My God That's Some Funky... Stuff
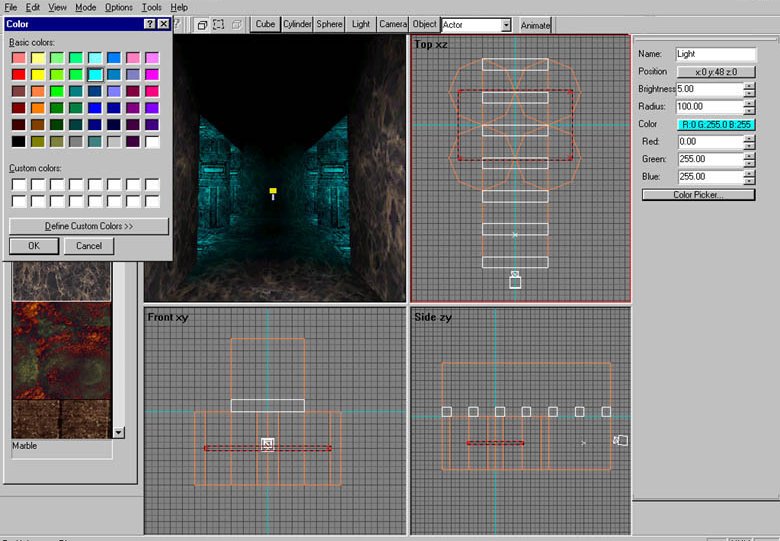 11.
Now we're ready for some lighting fun. Select the four lights in the cylinders
and click on the RGB bar next to the word "Color" in the properties window
on the right. Set "Red" to zero, or use the color picker (click on "Color
Picker") to choose a light blue color. Using the Side ZY view, shift-drag
to clone the rightmost light ( the X at the end of the hall) up and to the
left. In the menu to the right, change this new light's Radius to 250 and
it's Brightness to 4. Use the color picker to change the color to orange
(255 128 0). Drag this light around in the Side view and notice the changes
in the 3D view. To get a better angle, let's make a new camera by clicking
the 'Camera" button, then clicking (in the Top view) to the left of our
entire structure. Roll the camera right and then move the light around again.
Try moving the orange light up and down the hall, first close to the rafters,
and then further away (next to the ceiling). Try moving it BELOW the rafters.
I found that close to the ceiling, halfway down the hall looks best.
11.
Now we're ready for some lighting fun. Select the four lights in the cylinders
and click on the RGB bar next to the word "Color" in the properties window
on the right. Set "Red" to zero, or use the color picker (click on "Color
Picker") to choose a light blue color. Using the Side ZY view, shift-drag
to clone the rightmost light ( the X at the end of the hall) up and to the
left. In the menu to the right, change this new light's Radius to 250 and
it's Brightness to 4. Use the color picker to change the color to orange
(255 128 0). Drag this light around in the Side view and notice the changes
in the 3D view. To get a better angle, let's make a new camera by clicking
the 'Camera" button, then clicking (in the Top view) to the left of our
entire structure. Roll the camera right and then move the light around again.
Try moving the orange light up and down the hall, first close to the rafters,
and then further away (next to the ceiling). Try moving it BELOW the rafters.
I found that close to the ceiling, halfway down the hall looks best.
 12.
Let's finish up the geometry. Move the Side ZY constructor line back down,
to one block below all the geometry. Click on the big hall brush (top or
bottom right), and drag it 1 block down so that it lines up with the blue
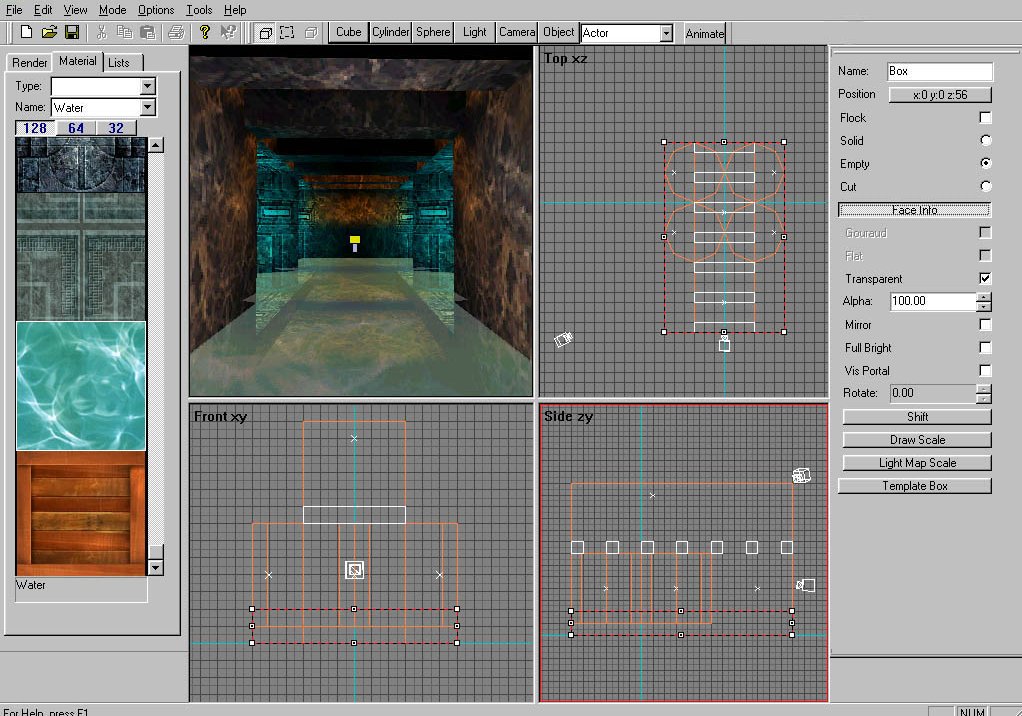
line. Now for some water: add a Cube, making a box in the Top XZ view, surrounding
all -the geometry with it. When you release, take the height up to two blocks
(up from the bottom of the blue constructor line), and click to finish (left
or right). Set the new cube to "Empty" by going to the properties window
on the right and checking the "Empty" check box. Then open up the Face Info
properties by clicking the "Face Info" button, and check "Transparent" so
we can see through it. Click on anything else to deselect, and the 3D view
will update to show your new change.
12.
Let's finish up the geometry. Move the Side ZY constructor line back down,
to one block below all the geometry. Click on the big hall brush (top or
bottom right), and drag it 1 block down so that it lines up with the blue
line. Now for some water: add a Cube, making a box in the Top XZ view, surrounding
all -the geometry with it. When you release, take the height up to two blocks
(up from the bottom of the blue constructor line), and click to finish (left
or right). Set the new cube to "Empty" by going to the properties window
on the right and checking the "Empty" check box. Then open up the Face Info
properties by clicking the "Face Info" button, and check "Transparent" so
we can see through it. Click on anything else to deselect, and the 3D view
will update to show your new change.
Extra Snazz
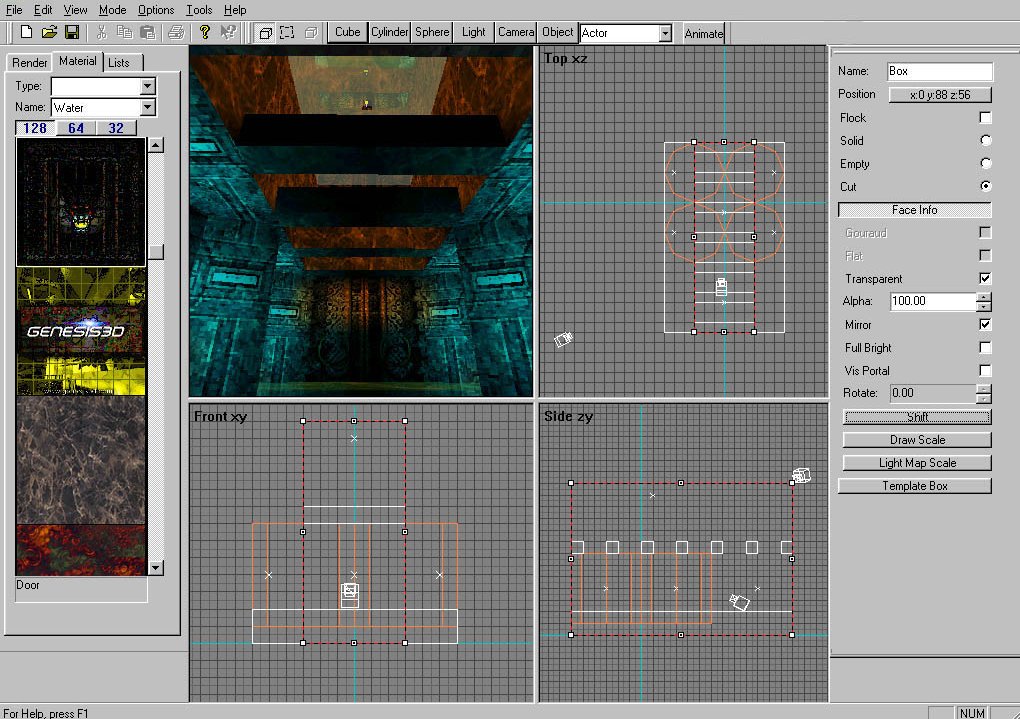 13.
Position one of your cameras (perhaps the first if that's where you left
it) so that you can look up the hall. Select the face at the top of the
hall (the one that lines up with the tips of the cylinders) by clicking
on it in the 3D view. Select the Door texture to change the face. Open up
the Face Info 'Draw Scale' and 'Shift'. Here we can line our texture up
the way that we want it. Set the Draw Scale U & V to 0.5. Once you've
set your Draw Scale, change the Shift values to U= 30 & V= 58. Use the
right mouse button to look up in the 3D view. Set the ceiling face (with
Face Info) to "Mirror" by clicking on the Mirror box. Then select the Water
texture. Now turn and select the semi-circle ceiling faces of the cylinders
to Marble. Let's also change our rafter texture to solid_oldwood.
13.
Position one of your cameras (perhaps the first if that's where you left
it) so that you can look up the hall. Select the face at the top of the
hall (the one that lines up with the tips of the cylinders) by clicking
on it in the 3D view. Select the Door texture to change the face. Open up
the Face Info 'Draw Scale' and 'Shift'. Here we can line our texture up
the way that we want it. Set the Draw Scale U & V to 0.5. Once you've
set your Draw Scale, change the Shift values to U= 30 & V= 58. Use the
right mouse button to look up in the 3D view. Set the ceiling face (with
Face Info) to "Mirror" by clicking on the Mirror box. Then select the Water
texture. Now turn and select the semi-circle ceiling faces of the cylinders
to Marble. Let's also change our rafter texture to solid_oldwood.
Finishing up
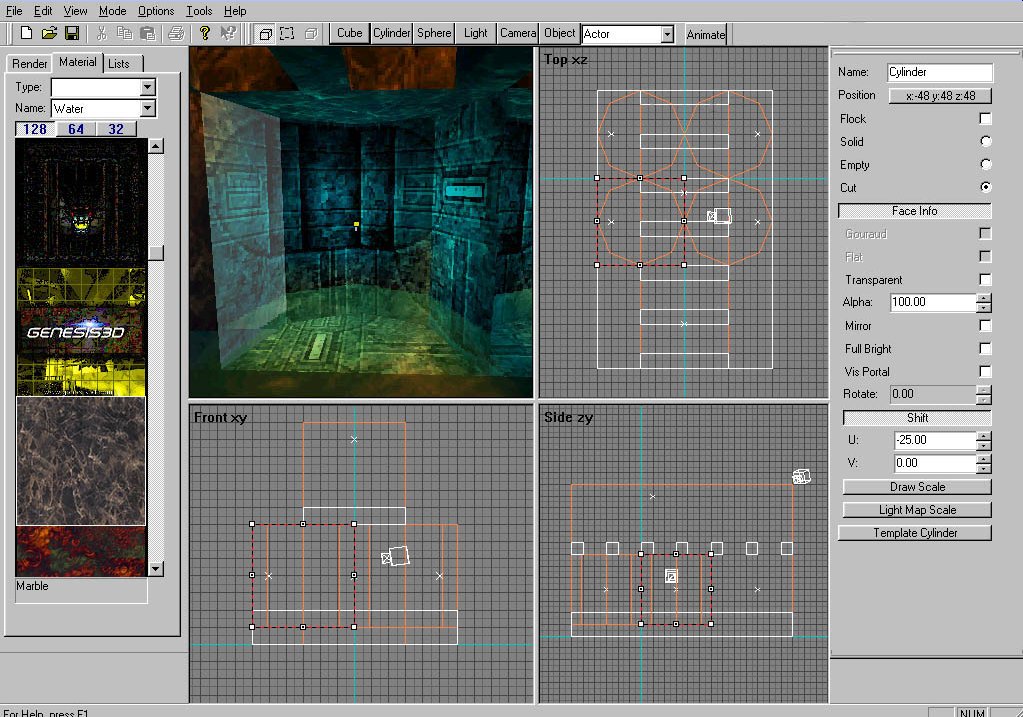 14.
Lastly, we shall do some simple alignment. Notice that the curved alcove
walls don't align properly. As with the door texture earlier, we'll be using
"Shift" under "Face Info" of the Properties dialog. We will want to keep
the V height the same on all surfaces. Set each V=38. You can play with
the alignment yourself to find out what looks best for your particular taste.
You can select each face of the cylinder and adjust the U values separately
or you can select multiple faces at once by holding down Ctrl and picking
the faces that you would like to shift together. Feel free to play with the
Shift and Draw Scale on any of the textures to get familiar with the tools.
14.
Lastly, we shall do some simple alignment. Notice that the curved alcove
walls don't align properly. As with the door texture earlier, we'll be using
"Shift" under "Face Info" of the Properties dialog. We will want to keep
the V height the same on all surfaces. Set each V=38. You can play with
the alignment yourself to find out what looks best for your particular taste.
You can select each face of the cylinder and adjust the U values separately
or you can select multiple faces at once by holding down Ctrl and picking
the faces that you would like to shift together. Feel free to play with the
Shift and Draw Scale on any of the textures to get familiar with the tools.
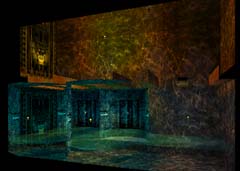 15. So now
admire your handiwork! With 4 textures and 4 brush shapes you made a nice
little entrance. Is this where you land when a rafter model gives way?
Perhaps there should be some Actors in the alcoves? Will there be doors
above and below?
15. So now
admire your handiwork! With 4 textures and 4 brush shapes you made a nice
little entrance. Is this where you land when a rafter model gives way?
Perhaps there should be some Actors in the alcoves? Will there be doors
above and below?